Good Monday morning!! So far this morning I've been doing my part to help the economy! A very hard decision has been made and my online orders have been placed and I can now relax about Christmas. Well at least the gift giving part. Whew!!! Now to get the house decorated. We'll do that in bits and spurts.
Now for Judy' Design Wall Monday --- Bonnies Orca Bay update: My lime green strings (in place of Bonnies blue) are almost half finished. These are soooo cute! Only 3.5" square! That's small by anyone's standards. lol well maybe not for Bonnie. I must admit they are a lot of fun to make and I'm enjoying this mystery so much.
Have a great day
Thanks for stopping by....
Ponder this.....
Monday, November 28, 2011
Thursday, November 24, 2011
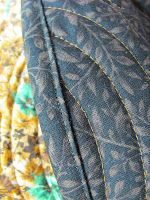
This afternoon I made the binding for this snuggle quilt that I'd made a few months back. (Sorry about the poor picture quality but I was running out of light)
I had already decided to attach the binding by machine like I did my last quilt....and then I got lucky!
I read Crazy Mom Quilts blog a couple of days ago. She has a post about attaching the binding by machine and she's changed it up a bit. It was like a bell went off when I read her instructions and it just made so much more sense to me. She said to sew the binding on the back and wrap around to the front and sew by machine. Of Course!!
Now this is where I changed it just a little bit more. Amandajean uses a 1/4" seam allowance when sewing the binding on the back and the front.
I use my walking foot and set the right-hand edge along the edge of the quilt & binding. That seam measures about 3/8".
Also when I turn the binding to the front (like I'm doing in these two pictures) I'll use the outside edge of the walking foot and run along the outside edge of the folded binding.
Another 3/8" seam.
And I take it slow and only sew a couple of inches at a time as I hold the binding in place.
I can see the back seam easily as I fold over the binding so I can make sure it is covering that seam. I love this method!
I've cut my binding 2.5" and did everything else just like Amandajean did in her instructions. But the larger seam allowance seems to put the final top seam right along the edge of the back seam and almost looks like it's been stitched in the ditch. And an added bonus is this also makes the binding the same size front and back.
I will definitely be binding all my everyday quilts with this method for sure. Especially now that they can finish out this nice.
Thanks bunches Amandajean!!
And.....TaDa.....
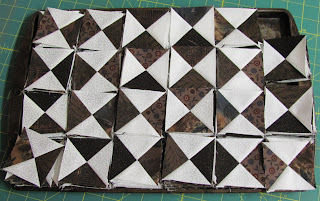
All of my 224 blocks lined up and lookin' pretty!
I'm ready for tomorrow's Orca Bay clue #2.
Thanks for stopping by....
I had already decided to attach the binding by machine like I did my last quilt....and then I got lucky!
I read Crazy Mom Quilts blog a couple of days ago. She has a post about attaching the binding by machine and she's changed it up a bit. It was like a bell went off when I read her instructions and it just made so much more sense to me. She said to sew the binding on the back and wrap around to the front and sew by machine. Of Course!!
Now this is where I changed it just a little bit more. Amandajean uses a 1/4" seam allowance when sewing the binding on the back and the front.
I use my walking foot and set the right-hand edge along the edge of the quilt & binding. That seam measures about 3/8".
Also when I turn the binding to the front (like I'm doing in these two pictures) I'll use the outside edge of the walking foot and run along the outside edge of the folded binding.
Another 3/8" seam.
And I take it slow and only sew a couple of inches at a time as I hold the binding in place.
I can see the back seam easily as I fold over the binding so I can make sure it is covering that seam. I love this method!
I've cut my binding 2.5" and did everything else just like Amandajean did in her instructions. But the larger seam allowance seems to put the final top seam right along the edge of the back seam and almost looks like it's been stitched in the ditch. And an added bonus is this also makes the binding the same size front and back.
I will definitely be binding all my everyday quilts with this method for sure. Especially now that they can finish out this nice.
Thanks bunches Amandajean!!
And.....TaDa.....
All of my 224 blocks lined up and lookin' pretty!
I'm ready for tomorrow's Orca Bay clue #2.
Thanks for stopping by....
Monday, November 21, 2011
Here's a peek at what I've been working on since Friday. I've joined Bonnie Hunters Orca Bay Mystery and these little beauties are step #1. Perfect quarter-square blocks.
Now I don't usually make perfect half or quarter square anything. Let alone this many anythings. My half squares (or 1/4 squares) are usually at least a little bit wonky or not quite the right size and I do a lot of trimming or stretching and finally give up and just try to "quilt it out".
Now, however, I have the perfect program to make any size "half square" come out perfect. Brenda Henning Triangulations CD.
OMGosh I can't believe how easy and nice these blocks are. 2.5" Aren't they nice? Yes! I think so too.
I've made a few more since this picture but I still have a lot more to do yet. The clue says we need to make 224!
This is what I printed out on sheets of newsprint. Then layered two pieces of fabrics with this sheet on top and sewed on the dotted line and cut on the solid and this is what they look like. >>>>>>>
AND...If it's Monday then Judy's Design Wall is up and I have a finished top to show. This is the last of the Christmas fabric and I'm pleased with the final product. Even tho it has some glitches and goofs it will still be a nice addition to my (now 3) Christmas snuggle quilts and I'm pleased that I have used up all this fabric line. Once I get it quilted I'll show off the back. For the first time I pieced it using all the leftover blocks and small pieces of yardage. I'll have just enough waste from the back to use for the binding. Here is the finished top...
You all have a great day.
Thanks for stopping by....
Now I don't usually make perfect half or quarter square anything. Let alone this many anythings. My half squares (or 1/4 squares) are usually at least a little bit wonky or not quite the right size and I do a lot of trimming or stretching and finally give up and just try to "quilt it out".
Now, however, I have the perfect program to make any size "half square" come out perfect. Brenda Henning Triangulations CD.
OMGosh I can't believe how easy and nice these blocks are. 2.5" Aren't they nice? Yes! I think so too.
I've made a few more since this picture but I still have a lot more to do yet. The clue says we need to make 224!
This is what I printed out on sheets of newsprint. Then layered two pieces of fabrics with this sheet on top and sewed on the dotted line and cut on the solid and this is what they look like. >>>>>>>
Then I trimmed the dog-ears and removed the paper before sewing the two halves together and TADA....perfect!!
Even the backs look good.
I'm going to link this post over on Bonnies blog so you can see what some of the other people are doing with their color schemes if you're interested. AND...If it's Monday then Judy's Design Wall is up and I have a finished top to show. This is the last of the Christmas fabric and I'm pleased with the final product. Even tho it has some glitches and goofs it will still be a nice addition to my (now 3) Christmas snuggle quilts and I'm pleased that I have used up all this fabric line. Once I get it quilted I'll show off the back. For the first time I pieced it using all the leftover blocks and small pieces of yardage. I'll have just enough waste from the back to use for the binding. Here is the finished top...
You all have a great day.
Thanks for stopping by....
Sunday, November 13, 2011
Good Monday Morning! Sure doesn't take long for the weeks to just keep rolling along.
I've spent this week pondering how I was going to stretch all of the blocks I've made to make a nice sized snuggle quilt.
After trying several different layouts.... this is the one I settled on.
I have a few leftover blocks that couldn't be used so I plan to use them in the backing. I do want to piece the leftover yardage of this line so I can use it all up.
At this point I still wasn't pleased with the size.
It still needed to be bigger and I have no more assorted fabrics to make any more blocks.
Sooooo I did a simple fix. I just added more borders and now this should do it! I'm going to have to do the quilting on this myself because some of the pinwheels have too much bulk in them for a longarm to quilt. A plain stipple should be fine and this will give me the opportunity to use my Juki for the first time since I've taken it off the frame.
Now grab your cuppa and head on over to Judy's Design Wall Monday and see what so many other quilters have been doing.
AND.....
Thanks for stopping by....
Monday, November 7, 2011
Last week went by so fast and here it is .... Design Wall Monday again.
This is what I've been working on this week. The very last of my Christmas fabric (Wrap It Up from Connecting Threads) in the #3 Christmas snuggle quilt. I'll have a few bits and pieces left over to go into the scrap drawers but almost all of this fabric line has been used up. Yeah for me!!
In my last post I told you where my design idea came from. Once I finished cutting and setting the basic blocks together and cutting off the wast half squares.... I decided I could probably combine both blocks into one snuggle quilt instead of making two table toppers like I thought I was originally going to make.
Somehow.... in the process of making the blocks....I goofedand added the corner fabric on the wrong side of some of the strip blocks.
I don't know! Don't ask how! Because I sure didn't know I was doing it at the time and only when I started putting them on the wall did I figure it out. So the joining 'stars' aren't the same on all blocks but I think I can still make this work without really drawing attention to my goof.. There will be many more Pinwheels that will be added. I do think the design in my head is starting to come together.
Happy Monday everyone. And if you haven't already been there....head on over to Judy's Patchwork Times to check out what other quilters have been working on.
Thanks for stopping by....
Subscribe to:
Posts (Atom)